Preliminary setup of 1C ZUP
First of all, to enable the functionality we are considering, you need to make some settings. They are located in the “Settings” - “Human Resources” menu.
In the window that appears, follow the hyperlink “Setting up staffing”. A form will be displayed in front of you, where the first thing you need to do is set the flag on the item “Staffing is being maintained.” Also in this form you can set up automatic verification of personnel documents for compliance with the staffing schedule, enable history keeping and much more.
Our team provides consulting, configuration and implementation services for 1C. You can contact us by phone +7 499 350 29 00 . Services and prices can be seen at the link. We will be happy to help you!
Work schedules and staffing
Opening hours
If the company has employees who work on schedules that differ from the standard (five-day week), start working by creating and filling them out. Since this data is used to create staffing schedules and personnel orders. In the Master data and administration section, open the Work schedules item. The work schedule is set for a certain period. If the schedule is not current, it is displayed in red in the reference book. The current schedule is in black. Let's consider the procedure for filling out the graph. To create a new one, click Create.
In the schedule, the user can set his own options for employees’ working hours, specifying methods for filling out the schedule for a certain period. If the filling period is not limited to the “to” date, then the schedule is valid until the end of the production calendar. To fill out the chart, cycles are used - a week or a period arbitrarily specified by the user. Having set the cycle, the working days for the created schedule are ticked in the filling template. Additionally, you can set a work schedule – Set schedule. When filling out the schedule, the user can adjust whether holidays are taken into account when filling it out or not - check the Consider holidays checkbox. This example shows a schedule with working days Wednesday and Thursday, having a filling cycle of 7 days - i.e. week, excluding holidays.
As an example, let’s create a schedule for employees working on a shift schedule “a day or two”. Those. The cycle for this schedule is 3 days. Let's set a certain number of hours for each shift. It is more convenient to set the starting date to the beginning of the year. The filling template contains the dates of the established cycle, where the user ticks the working day - for the first shift this is the 1st day. Accordingly, the 2nd and 3rd numbers are the dates of work for employees of other shifts. Follow the hyperlink Fill out the schedule and set the shift time.
The schedule is ready. If the work cycle according to such a schedule is 3 days, then three schedules are created for each shift. So the user can create arbitrary work schedules based on the operating hours of the enterprise. This data is used in drawing up staffing schedules and personnel orders.
Approval of staffing
You can find the staffing table in 1C ZUP in the “Personnel” menu. The first step is to approve it. This is done by a document of the same name.
In the event that approval has not been made previously, approval of the staffing table will be available to you. In this case, this document has already been created, and we follow the hyperlink “Approve new staffing table”.
The form of the new document will be displayed in front of you. In its header, indicate the organization, division and month from which this staffing table will come into force.
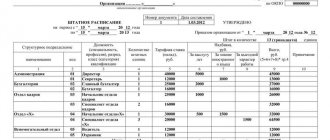
Since we had previously approved two staff positions, the tabular part of the document was filled in automatically. In case of creating the first approval, you need to add all the necessary positions.
When adding positions, as well as double-clicking with the left mouse button on an already created one, its card will open. In it you need to indicate the department and position. The name will be generated automatically and can be changed if desired. The number of units and work schedule are also set here. In our case, this is a five-day period.
On the “Payment” tab, the rank is indicated (if the maintenance function by rank was enabled in the previously configured program). The tabular section lists all types of payments applied to this position of the staffing table. In our case, the director only receives a salary of 70 thousand rubles.
Please note that the line with payment is highlighted in blue and in the comment the text “Increased salary (+ 5,000);” is indicated. This means that this position of the ShR was previously approved with a smaller amount. When creating a new position, such a comment will not appear, and the line will be the usual black color.
On the “Advanced” tab, you can specify the conditions for hiring and its nature, as well as set vacations.
After entering all the necessary data into the created staffing position, click on the “OK” button. It will appear in the “Staffing Schedule Approval” document.
Add all positions to the document in the same way and post it. Also, from this document, using the “Print” button, you can generate an order for approval of the staffing table and the T-3 form.
Now, returning to the staffing table itself, you will see in the list all the units you entered, indicating the date of approval. Here you can also view documents that approved and changed the staffing table, as well as create these documents. To print reports, use the “Print” menu.
The position directory will also display data from the staffing table (columns “Entered” and “Date of entry”). This data will also be displayed on the position card itself.
Entering and changing the staffing table
The staffing table in 1C ZUP is a list of positions that are stored here: “Personnel” - “Staffing table”. A position is a line where the exact position in a certain department of the organization with established working conditions is written down, and the number of staff units is also indicated there. In orders for admission, transfers, etc. The position will need to be selected from the list of positions in a specific department. The program itself will generate the documents according to the conditions that were previously specified. Moreover, there is the right to change the conditions directly in the orders. Reshuffles often occur in organizations - some positions are opened, others are removed, working conditions are changed, etc. PP 1C allows you to make these adjustments and save them. There are two options for working with ShR. The main criterion is whether the “History of staffing changes is maintained” function is activated. 1. Option disabled. Positions are entered into the “Staffing List” directory and edited in the position card. It is worth paying attention to the fact that the previous conditions are not fixed; positions are deleted directly in the card. 2. The option is enabled. When the history of changes is saved in 1C, we work according to the following documents: “Approval of the staffing table” and “Change of the staffing table”. They allow you to enter new positions, edit and remove current ones.
Working in the program without saving history
This is possible if the “History of staffing changes is maintained” activator was removed during setup. So, everything in order: 1. Before forming the HR, you need to compile directories: section “Personnel” - “Staffing” - “Divisions”; and “Personnel” - “Staffing” - “Positions”. 2. To enter and edit data on positions, open the “Staffing table” directory. 3. After activating the “Create” button, you can enter positions - a standard form will open, where you can describe the position. 4. Each individual position can be adjusted: rates, charges, etc., or closed. 5. The ShR is approved as follows: in the “Staffing table” we go separately to each position, click in the “Position approved” section and put the number when the order was issued.
Entering and changing with history saved
This option is possible in 1C when in the “Setting up the staffing table” template, in the subsection “The history of changes in the staffing table” is marked with activation. 1. If the enterprise draws up documents on staffing with recording the history of their creation, then changing the number of rates, excluding positions and changing various types of criteria should be done using the documents “Approval of the staffing table” and “Change of the staffing table”. 2. The journal will display the following links: “Open a document that approved the current staffing table”, “Approve a new staffing table”, “Change the current staffing table”, “Document that changed the staffing table”. 3. To enter positions and display existing changes, do the following: “Personnel” – “Staffing” – “Changes to staffing” – “Create” button – “Approval of staffing”. Describe changes affecting several divisions of the company, which will ultimately lead to the writing of a new schedule. 4. The changes that are made correspond to a particular month and come into force on its first day. 5. The initial filling of “Approval of the staffing table” (until the entire process is described in the software) is carried out manually. 6. To enter a new staff unit, click on “Add position”, indicate the position, designate the department, position, number of rates, work schedule, etc. 7. It’s even easier to exclude a staff position - select the line with the unnecessary column and activate “More” - “Close selected positions”.
To make minor changes that will not affect the existing structure of the organization, you should use the following algorithm – “Staffing” – “Changes to the staffing” – “Create” button – “Changing the staffing”. This process is very suitable for small adjustments, for example, in a single department. In addition, the document gives the right to register changes from any date. Everything else goes the same as in the “Approval of staffing table” section. If you follow the link “Documents that changed the staffing table”, you will be able to see all the documents that in one way or another relate to the company’s personnel records.
Indexation of earnings
If you activate “Employee earnings are being indexed,” the indexation of the employee’s salary will be reflected. Let's consider how you can register salary indexation. The best assistant for this is the document “Changing the Staffing Schedule”. 1. In the “Staffing table” directory, go to “Change the current staffing table”. 2. The document “Change the staffing table” will be displayed. To select indexed positions, click “Change Position”, a form will appear in which you can select the desired positions. 3. On the “Fill in indicators” button, set the indicators that need to be indexed. 4. As soon as the indexation is reflected in the HR, it can also be reflected in the planned accruals of employees. If all this is not done, then indexing will not actually happen. 5. To protect yourself from this, you need to do the following: create “Change planned accruals” - go to “Change employee accruals” (located at the bottom of the table). Everything will happen on its own, according to the existing arrangement of specialists, the PP itself will activate the option “Take into account as indexation of earnings.” The main result of everything described above: we recommend that you first reflect the indexation planned in the company in the HR, and only then in the planned accruals of employees. By and large, everything we wrote about today can be done on your own. But, if difficulties arise, we recommend that you still seek advice from experienced MasterSoft specialists.
Changes in salary and planned accruals
There are cases when an error was made when creating a staffing approval, or you need to change accruals for a certain position. All such actions can be performed in a previously created approval document.
On the staffing form, click on the link “Open the document that approved the current staffing table.”
In the document that opens, make all the necessary changes and submit it. Also from here you can create a change in planned accruals using the button of the same name.
As a result, a new document will be created indicating which employees were assigned which accruals. The effective date of these accruals is indicated in the header of the document.
How to make changes to the staffing table in 1C ZUP
To make local changes to the existing staffing table (which do not greatly affect the structure of the enterprise), the document “Changes to the staffing table” is intended in 1C ZUP 3.1. You can find it both from the “Personnel” menu and from the staffing list form. In the second case, just click on the hyperlink “Change the current staffing table”.
We will not describe the principle of filling out this document, since it is similar to filling out the approval of the staffing table.