Accounting settings
Initially, you must indicate in which program the payroll records will be kept: in this program or in the external environment. To maintain salary accounting in 1C Accounting software, you need to select the “in this program” option. In the future, all work will be considered when maintaining records in 1C Accounting 3.0. If the work is carried out in another third-party program, for example 1C ZUP, then select the accounting option “in an external program”. When this setting is selected, some functionality becomes unavailable.
The basic settings that are needed for maintaining salary accounting are available at the link “Salary accounting procedure”. If you click on it, you can see one line with preliminary settings.
If you click on this line, a form opens, which consists of three tabs. Let's look at them in more detail and understand the data required for entering.
1.1. Salary
- "Production calendar". First, the planned work schedule for the year is indicated. By default, the production calendar for the Russian Federation is used.
- "Method of reflection in accounting." The first tab contains data on how wages are reflected in accounting. This means to which cost account and under which cost item the salary accounting data should be reflected. If the salary of the entire organization is accounted for in one way - for example, for a trade organization all costs are sent to account 44 - then you can specify the default accounting method and select the account, cost item and cost item for UTII activities, if such activities are carried out. Then you need to click “Save and close”. If in an organization the wages of employees are reflected in different ways - for example, there is production and the wages of department employees are reflected in account 20, and there are administrative personnel whose wages are recorded in account 26. In this case, you can choose the method of reflecting accruals according to default and it is better to do this for the way in which the salary of most employees is reflected. In addition, functionality can be configured for each employee or for accruals as a whole. If the method is not specified for the user, then his salary will be reflected in the method specified in the salary settings.
- “Valid from...” - indicates the start date of the accounting. The “History” link provides information on previous changes to the accounting method.
- It is necessary to reflect the dates of salary and advance payment in the “salary is paid” and “advance is paid” fields.
- “Advance amount” - you must select whether the general value of the advance amount and the accrual option (as a percentage of salary or a fixed amount) are set for all employees or individually for each employee. The default is the first option. If you choose the second option – for each employee separately – you can indicate the amount of the advance in the “Hiring” document.
- “Payment of sick leave” - you must indicate whether our company is participating in the Social Insurance Fund pilot project. That is, if we are located in a subject of the Russian Federation that has joined the FSS pilot project, then we need to fill in the date of transfer of benefit payments to the FSS.
1.2 Vacation reserves
If vacation reserves are formed at the enterprise, then you need to check the appropriate box “Form vacation reserve” and fill in the fields:
- “Limit amount of deductions per year”
- “Monthly percentage of contributions to the payroll”
- “Valid with...” with the ability to view the history of changes.
- “Duration of annual leave of employees in days”
- "Method of reflection in accounting"
1.3 Territorial conditions
Let's go to the third tab. In the event that your company pays allowances according to the northern allowances or the regional coefficient, if you are located in such a region, then you must check the appropriate box. As a rule, the regional coefficient is federal, and the regional coefficient applies to benefits and sick leave payments, so this setting must be taken into account. The regional coefficient is indicated in the format 1.2, for example, where 2 means a 20% premium.
If you return to the “Salary” tab, you can see at the bottom of the form an accessible link “Set up taxes and reports”. A window for general settings of accounting policies for tax accounting purposes opens.
But you should pay attention to 2 tabs - “Personal Income Tax” and “Insurance Premiums”.
The first tab outlines how the standard deduction is applied. There are two options: “Cumulatively during the tax period” and “Within the taxpayer’s monthly income.”
You should also pay attention to the “Insurance Premiums” section, especially if your insurance premium rate is special. For example, if the company does not apply the basic tariff, but there are some benefits, then you must choose the appropriate tariff. You also need to fill out this tab for those organizations whose accident contribution rate differs from 0.2%. If your company has additional contributions, then they also need to be reflected in the appropriate fields.
After these steps, you can consider that the configuration of general settings parameters is completed. However, please pay attention to the following points.
1.4 Salary calculation, recording and setting up classifiers
The most important function here is the “salary calculation for separate departments” setting. It is designed to give users the opportunity to generate personal income tax reporting for different checkpoints and OKTMO. However, it will not be possible to maintain full accounting for such departments in 1C Accounting 8.3; for this, the CORP version is used.
You can also go to the all accruals window from this form. Here you can see a complete list of all deductions that apply in the organization. If necessary, you can add one-time charges here. For example, bonuses, settlements upon dismissal, and others.
There is also a complete list of deductions, which is available via the link of the same name.
The next section is “Reflection in accounting”. All methods of maintaining payroll records are stored here. By default, you need to specify the method for reflecting salary in general settings. You can also add other methods here and assign them individually to employees, or set a separate method for each accrual.
In addition, there is an important setting for salary cost items. You need to fill in the cost item - “wages” and “UTII wages”, if such activities are carried out, and in the other column - the corresponding cost item for insurance premiums.
The “Classifiers” section is intended for filling in the parameters for calculating insurance premiums paid to the Pension Fund, Social Insurance Fund, and Compulsory Medical Insurance Fund, such as insurance discounts on income, that is, non-taxable amounts.
The types of income and deductions used when calculating personal income tax are also available. Examples of deductions, their types with explanation and types of personal income tax are available here.
Buy something for yourself
Did you help others? Don't forget about yourself. In order for you to have money, you need to please yourself. Anything - your favorite cakes, a new dress, a cute notebook, a toothbrush... The main thing is that the purchase gives you pleasure and is pleasant.
They love when they are welcome, when they are exchanged for things pleasant and dear to the heart. Only to such a person will money always return to bring even more joy.
Don't forget about yourself, even if times in life are not the best. At least you need to give yourself something.
Accrual and payment of advance
Every employer is required to pay an advance to its employee in order to avoid fines and sanctions from the state. The advance must be paid to the employee at least every six months.
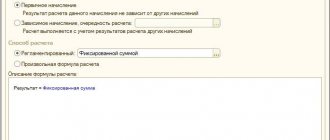
As already discussed above in the preliminary settings (Salaries and personnel - Salary settings - Salary accounting procedure), you can set the following parameters:
- Calculation method – fixed amount or percentage of salary
- Advance amount
There are two ways to pay an advance: from the company’s cash desk or through banking transactions. Let's take a closer look at both options.
2.1 Through the cash register
For payment through the cash desk, the document “Statements to the Cashier” (“Salaries and Personnel” – section “Salaries”) is drawn up. The log of already created documents opens. To create a new one, click “Create”.
In the new document you need to fill in the following information:
- Month – time for which the advance must be paid
- Type of payment - salary or advance
- Organization
- Subdivision
After this, you need to click “Fill”. Data will be released for advance payment for all employees. The tabular part of the document can be adjusted. You can also manually change the amount of the paid amount.
By clicking the “Print” button, you can print the “Payment Statement” or “Payroll Statement”.
After completing the “Statement to the Cashier” document, you need to create the cash documents themselves. They can be generated manually in the appropriate section or from a completed statement using the “Create based on” button - “Cash withdrawal”. In the document being drawn up, check the correctness of the completed details, change the expense item if necessary, and you can specify the printing details that will be displayed in the cash receipt.
After posting the document, you can view the completed transactions using the “DtKt” button. In them, the program pulled up the employee’s data and made a posting, writing off accounts from 50.
From the “Cash Withdrawal” document, you need to print out the cash receipt order and issue the money to the employee.
2.2 Via bank
Payment of an advance through a bank can be carried out both with the help of a salary project and without it. In this case, let’s look at an example without a salary project. In such a situation, the employee must independently open a bank account and notify the employer about this by providing the bank card details. This data must be entered into the employee’s card on the “Bank Accounts” tab.
The operation of issuing an advance to an employee through a bank is documented in the document “Statement to the Bank” (“Salaries and Personnel” - “Salary”). This document records the fact of issuing an advance to the employee.
In the new document you need to fill in the following information:
- Type of payment - salary or advance
- Month for advance payment
- Organization and department of the employee
Next, click the “Fill” button to fill out the tabular part of the document, which can be adjusted if necessary.
By double clicking on the “To be paid” field, you can see a detailed breakdown of the payment of the amount of money to the employee. After checking all the document data, it needs to be carried out. If the document has not been paid, then the “Pay statement” button is active at the bottom of the tabular part.
After completing the “statement to the bank”, you need to draw up the document “Payment order for salary payment”. The document can be created manually or using the “Create based on” button. It is also convenient to use the special processing “Payment order for each employee”.
The payment order form displays the data that has already been filled out according to the statement documents to the bank, except for such data as:
- Payment order date
- Account for salary transfer
When using service processing to create payment orders for all employees, a list of documents will be automatically generated individually for each employee using the “Create documents” button.
After completing payment orders, you need to create the last document to complete the advance payment transaction - “Write-off from the current account.” This document is created directly upon receipt of the bank statement. It is recommended to fill out this document from the “Statement to the Bank” by clicking the “Pay Statement” button. Instead of this button, a link to a new document will appear.
The “Write-off from the current account” indicates the type of operation “transfer of wages to an employee”, the recipient of the payment and its amount and other details.
For convenient user experience, 1C has developed a special DirectBank service, with which you can send documents to the bank and receive answers from it in a few clicks. The great advantage of this service is that it allows you to exclude intermediate files from exchange with the bank, which significantly increases the level of security of the organization.
Payroll
This operation is completed in the “Salaries and Personnel” tab - section “Salaries” - “All accruals”. A list of already completed documents of different types of accruals opens.
To create a new document, you need to click the “Create” - “Payroll” button. The form for creating a new document indicates:
- Salary for... – month of salary accrual
- Accrual date
- Organization of employee employment
- Department – filled in if the employee belongs to a specific department.
After that, click the “Fill” button to automatically fill out the document. After this, the document table will contain the amounts of accruals, calculated personal income tax and insurance contributions for employees.
You should pay attention to the functionality available through the “Accrue” and “Hold” buttons.
They allow you to accrue and withhold additionally all payments to employees, any accrual or deduction created earlier.
To calculate salaries for certain employees, you need to use the “Add” and “Selection” buttons.
Let's take a closer look at the document fields. The “Accrued” column indicates all calculated employee accruals. If you click on the column several times, a form will open that reflects the employee’s department, accruals, types of accruals, the amount of working time worked according to the production calendar, and the amount of deduction if necessary.
Click the “More details” link to open the employee’s preliminary payslip. After posting the “Payroll” document according to the payslip, the data will become actual.
By clicking the “Hold” button, it is possible to manually fill out deductions for employees. In the new window you need to indicate the name of the deduction, its amount and the recipient.
In addition, the document “Payroll” contains information on personal income tax. When you double-click on this column, a window opens with personal income tax data, which are calculated using the cumulative total method by type of income. The amounts of deductions that were provided to the employee are indicated.
Also on the form there is a checkbox “Adjust calculation”, which is checked if it is necessary to make changes to the value of the calculated personal income tax.
At the bottom of the form there is a link “Tax accounting register for personal income tax”, where you can see all the tax accounting data for personal income. persons for each employee for the period.
The “contributions” column displays the data that was calculated by the insurance premium program. When you double click on the specified column, a window appears where you can see the insurance premiums for each employee. Also in the new form there is a link “Insurance Premium Accounting Card”, where a printed form is available according to the specified data.
After filling out all the information on salary, contributions and deductions, the “Payroll” document needs to be processed. After posting the document, postings are generated, which can be viewed by clicking the “DtKt” button, and wages are calculated according to account 70.
Payroll can be calculated in several ways:
- According to salary, in proportion to days worked
- Salary based on hours worked
Let's consider the first case, when the salary depends on the number of working days. In such a situation, you first need to set up the accrual type Payment by salary (section Salary and HR - Salary settings - section Payroll - link Accruals). After this, the specified type of accrual must be set in the “Hiring” document.
Next, the “Salary Accrual” document is drawn up, which already indicates the type of accrual “salary payment”.
The formula for calculating an employee's salary is as follows:
Final salary = Monthly tariff rate/ Monthly time limit in days * Time in days
In the second case, when the salary is calculated in proportion to the hours worked, you need to set up the accrual type Pay by hour (section Salaries and personnel - Salary settings - section Payroll - link Accruals).
This type of accrual, as in the previous example, is indicated in the “Hiring” document. The final calculation of salary occurs in the “Payroll” document using the following formula:
Final salary = Monthly tariff rate or salary / Standard time for the month in hours * Time worked in hours
After completing documents for payroll, employees need to complete documents for issuing funds. Similar to advance payments, salary can be issued in several ways - through the company’s cash desk or to employees’ bank cards. In this case, the list of documents for each payment method remains the same as for an advance payment.
Salary project
The 1C Accounting 3.0 program implements the functionality of calculating salaries using a salary project. This term refers to a service provided by a bank for transferring wages to employees in non-cash form to their personal accounts that are opened with this bank. The convenience of this service lies in the fact that you do not need to create a separate payment order for each employee, but you can download the payroll slip and upload it to the Client-Bank and send the data directly to the bank itself. If the enterprise has a large number of employees, this functionality significantly saves the accountant’s time.
First of all, you need to contact the bank with which the organization cooperates and conclude an agreement on the salary project. After this, you can proceed to the program setup stage.
To do this, in the “Salaries and Personnel” tab, in the “Directories and Settings” section, select “Salary projects”. The project log opens; when creating a new one, click the “Create” button.
On the project creation form we indicate the following information:
- Organization
- Bank service
- We put the flag “electronic document exchange”
- Number and date of the salary project agreement
- Currency
- Service department
- Checking account
Bank card payment system
Next, go to the employee directory (“Salaries and Personnel” - section “Personnel”). In each employee card, in the “salary payment” field, set the value “according to the salary project.”
Click on the red link “Fill in your bank account”. In a new window you need to indicate your salary project and personal account.
After these operations, you can proceed to creating a statement to the bank. When creating, select the document type “for salary project”. After posting the document, click “Upload file”. Next, you need to go to your personal account, download the statement and send it to the bank. After the statement is sent and the money is debited, a payment confirmation will be sent to the Client-Bank. It will need to be unloaded and loaded into 1C using the “Confirmation from the bank” button in the statement to the bank. After downloading the file, the link will change to “Statement Paid.”
Please your loved ones with sweets
And to make your life happy and sweet, buy some sweets for your home to please your family and loved ones. You can also bring sweets or baked goods to work, then there will be a good atmosphere in the workplace.
Sweets must be bought with coins. It is believed that after 1 day has passed from receiving your salary, you need to exchange the pieces of paper for small change and buy sweets. The main thing is, don’t be shy - many sellers know about this money tradition, and never swear that you give “kopecks”.
To keep money in the house, use the positive energy that will envelop you after receiving your salary. This will help make your home a full cup, and there will be peace and tranquility in the family.